
Beginner
5 mm
About 8 in wide
US Crochet
Crochet pumpkin basket pattern: this easy Halloween project starts with a flat round base, continues upward into a simple basket wall, and is shaped into a pumpkin with evenly spaced vertical sections. A crocheted handle, green leaf and curly vine finish the top, while a black jack-o’-lantern face turns the basket into a fun candy holder.
How do you crochet a pumpkin basket?
Crochet a flat circle for the base, work straight rounds upward to form the basket, then divide the outside into eight pumpkin sections using long strands of yarn pulled from the bottom to the top. Add a firm crocheted handle, sew on a green leaf, crochet a curly vine and finish the front with a simple jack-o’-lantern face.
The pattern is designed to look detailed without requiring complicated stitches. Most of the basket uses single crochet, and the pumpkin shaping happens after the main basket is complete. That means you can concentrate on keeping the base flat and the walls even before adding the decorative details.
Use the finished basket for wrapped Halloween candy, small crochet gifts, fall table decor or a seasonal shelf display. If you leave off the face, the same pattern becomes a simple autumn pumpkin basket that can stay out through Thanksgiving.
What you will find in this pattern
A simple basket shaped into a pumpkin
The main basket is crocheted first as one sturdy piece. Once the walls are finished, long strands of orange yarn create the deep vertical pumpkin grooves. The handle and green details are made separately and sewn to the rim.
- ✓ Flat circular base keeps the basket stable.
- ✓ Straight single crochet rounds form the walls.
- ✓ Eight yarn channels create the pumpkin shape.
- ✓ Handle, leaf, vine and face are added last.
Materials for the crochet pumpkin basket
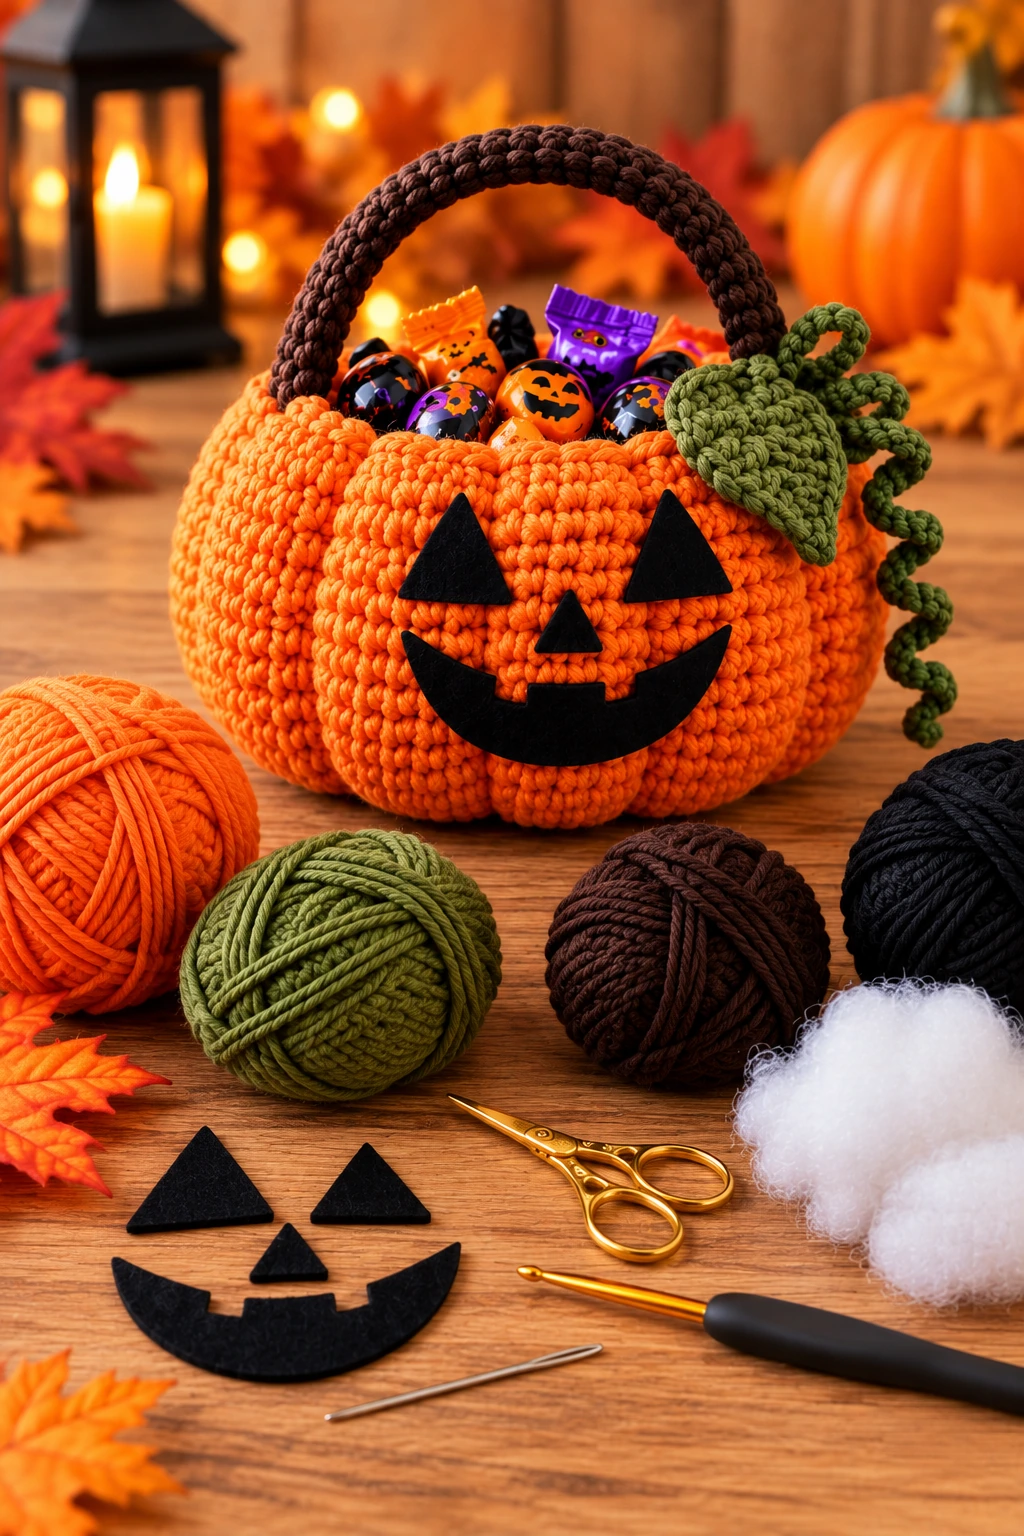
You will need
- 180 to 220 yd (165 to 201 m) medium weight #4 orange yarn
- 35 to 50 yd (32 to 46 m) medium weight #4 brown yarn
- small amount of green yarn
- small amount of black yarn or black felt for the face
- 5 mm crochet hook
- stitch marker
- tapestry needle
- scissors
- optional removable fabric clips for positioning the face
Which yarn works best?
Cotton, recycled cotton and firm cotton-acrylic blends work especially well for baskets because they hold their shape. Very soft acrylic can still be used, but the finished basket may feel more flexible.
Stitches and abbreviations
US crochet terms
- MR = magic ring
- ch = chain
- sc = single crochet
- inc = 2 sc in the same stitch
- sl st = slip stitch
- BLO = back loop only
- st / sts = stitch / stitches
Pattern notes
The base and walls are worked in continuous spiral rounds. Move the stitch marker to the first stitch of each new round.
A back-loop-only round creates a clean corner between the base and side wall.
The abbreviations in this pattern follow standard US crochet terminology. You can also review the Craft Yarn Council crochet abbreviations.
Finished size and gauge
With medium weight #4 yarn and a 5 mm hook, the finished basket measures approximately 7.5 to 8.5 in (19 to 21.5 cm) across and about 5.5 to 6 in (14 to 15 cm) high before the handle.
Gauge is not critical, but the fabric should be dense and firm. If your basket walls feel floppy, use a smaller hook or hold two lighter strands together.
Crochet the pumpkin basket
Use orange yarn. Begin with the flat circular base and continue directly into the basket walls.

Round 1: 6 sc in MR. (6)
Round 2: inc in each st around. (12)
Round 3: (1 sc, inc) x 6. (18)
Round 4: (2 sc, inc) x 6. (24)
Round 5: (3 sc, inc) x 6. (30)
Round 6: (4 sc, inc) x 6. (36)
Round 7: (5 sc, inc) x 6. (42)
Round 8: (6 sc, inc) x 6. (48)
Round 9: BLO sc in each st around. (48)
Rounds 10 to 20: sc in each st around. (48)
Round 21: sc in each st around. Join with sl st to the first sc. (48)
Finish: fasten off and weave in the working end.
Shape the pumpkin sections
The deep pumpkin grooves are made after the basket is finished. Cut eight long strands of orange yarn, each about three times the height of the basket plus the width of the base.
- Mark eight evenly spaced positions around the rim.
- Thread one orange strand onto a tapestry needle.
- Bring the strand from the center underside of the base up along the outside of the basket to one marked rim position.
- Take the yarn over the rim and return it down inside the basket to the base.
- Pull gently until a visible pumpkin groove forms, then secure the strand at the base.
- Repeat at the remaining seven positions.
Tighten all eight strands gradually. If one section is pulled much tighter than the others, the basket can lean or lose its round shape.
Crochet the handle, leaf and curly vine

Brown handle
Foundation: ch 46.
Row 1: sc in the 2nd ch from hook and across. 45 sc. Ch 1, turn.
Rows 2 to 3: sc across. 45 sc. Ch 1, turn.
Finish: fasten off with long tails at both ends. Fold the strip lengthwise and whipstitch the long edges together to create a firm rounded handle.
Green leaf
Foundation: ch 9.
Starting in the 2nd ch from hook, work: sl st, sc, hdc, dc, dc, hdc, sc, sl st.
Rotate the chain and repeat the same sequence along the opposite side of the foundation chain.
Fasten off with a long tail for sewing.
Curly vine
Foundation: ch 28.
Work 3 sc in the 2nd ch from hook and 3 sc in every remaining chain. The extra stitches naturally curl into a spiral. Fasten off with a long sewing tail.
Attach the handle
Position one end of the handle on each side of the basket. Sew through several rows of the basket wall, not only the top edge, so the handle is securely anchored. Add the green leaf and vine near one handle attachment point.
Add the jack-o’-lantern face

Cut two black triangles for the eyes, one smaller triangle for the nose and one curved smile with a small tooth shape. Arrange everything on the front before attaching it.
- Place both eyes at the same height and leave a small gap between them.
- Center the nose below the eyes.
- Place the mouth low enough that it does not overlap the bottom curve of the basket.
- Sew felt pieces securely with black sewing thread, or embroider the shapes directly with black yarn if you prefer an all-crochet finish.
Common crochet pumpkin basket mistakes
The base curls upward
Check the increase count in every base round. If the base cups before the BLO round, your tension may also be too tight.
The walls flare outward
Keep exactly 48 stitches in every wall round. Accidental increases at the round marker are a common cause of a widening rim.
The pumpkin sections are uneven
Mark all eight positions before adding the shaping strands, then tighten each strand a little at a time rather than finishing one section completely before the next.
The handle feels weak
Sew each handle end down across several basket rows. Do not attach the handle only to the final rim stitches.
More Halloween crochet projects
Frequently asked questions about crochet pumpkin baskets
Is this crochet pumpkin basket pattern good for beginners?
Yes. You should already know single crochet, a magic ring and basic increases. The pumpkin shaping is done after the main basket is crocheted, so the construction stays simple.
Can I make the basket larger?
Yes. Continue increasing the flat base by six stitches per round before working the BLO turning round. Keep in mind that a larger basket may need a firmer yarn or a double strand for better structure.
Can I leave off the Halloween face?
Absolutely. Without the black face, the basket becomes a simple fall pumpkin basket that works for autumn and Thanksgiving decor.
Why is my pumpkin basket floppy?
The yarn may be too soft or the hook may be too large. Try a smaller hook, firmer cotton yarn or two strands held together.
Can children use this as a trick-or-treat basket?
It can hold lightweight wrapped treats, but check the handle attachment carefully before use. For heavier loads, use a stronger yarn and reinforce both handle ends with additional sewing stitches.
Quick pattern to save
- Start with 6 sc in a magic ring.
- Increase evenly to 48 stitches over 8 rounds.
- Work one BLO round to turn the base upward.
- Work 12 straight rounds for the basket wall.
- Add eight vertical shaping strands to create the pumpkin sections.
- Crochet and sew on the brown handle.
- Make one green leaf and one curly vine.
- Add the black jack-o’-lantern face.
Rimraam tip
Before attaching the face, fill the basket lightly with a towel or clean fabric. This pushes the front wall into its natural shape and makes it much easier to center the eyes, nose and mouth.
A handmade pumpkin basket for Halloween night
Use it for wrapped treats, fill it with small crochet gifts or leave out the face for a cozy pumpkin basket that works all through fall.
Note: finished size and yarn use are approximate and can vary with yarn, hook size and tension. Check the handle and all sewn decorations before using the basket to carry treats.
Helpful crochet pumpkin basket video tutorial
For an additional visual reference, this English-language pumpkin basket tutorial from PlotkaDesign demonstrates how a crocheted pumpkin-shaped basket is built and shaped. The construction and stitch counts differ from the Rimraam pattern above, so follow the written instructions here for this specific Halloween treat basket.
Video: external English-language tutorial on YouTube. The Rimraam written pattern above remains the main pattern for this project.
3 thoughts on “Easy Crochet Pumpkin Basket Pattern for Halloween”